The Flowlet is our integration solution, one of de main components of the Nasph Platform, and the main goal is to facilitate the challenge of creating business integrations in the organizations.
We are using the Low-Code approach, connecting the components, where each will perform a specific task.
Our solution is built on top of Node-red, a widely adopted integration solution initially made by IBM and developed under the Apache License. We aim to collaborate with the open-source project and create new components to let even not-so-experienced developers create very complex integration scenarios.
Creating a first integration Flow (SOAP to REST)
Let’s put Flowlet in some practice, in the following example, we will implement the following scenario:
- To connect an existing SOAP Web Service that receives a celsius temperature and returns the Fahrenheit.
- The Service URL is: https://www.w3schools.com/xml/tempconvert.asmx
- We have to send the following XML via HTTP POST Method:
<?xml version="1.0" encoding="utf-8"?>
<soap12:Envelope xmlns:xsi="http://www.w3.org/2001/XMLSchema-instance" xmlns:xsd="http://www.w3.org/2001/XMLSchema" xmlns:soap12="http://www.w3.org/2003/05/soap-envelope">
  <soap12:Body>
    <CelsiusToFahrenheit xmlns="https://www.w3schools.com/xml/">
      <Celsius>20</Celsius>
    </CelsiusToFahrenheit>
  </soap12:Body>
</soap12:Envelope>- Look, we have a variable to be sent, in that case, via the <Celsius> Tag, in the example above we are sending 20 celsius, the expected result should be the value in Fahrenheit
- Challenge: We must convert this SOAP web service for a REST API.
Flowlet in Action
Let’s clone our sample repository from our Github: https://github.com/nasph-io/integration
git clone https://github.com/nasph-io/integrationHere after this, we will execute the following command in the terminal:
./integrator.sh create ws2rest
note: (for Linux and MacOS - For windows use .bat )
The result will be as the following image:

If you have de Visual Studio Code adequately configured, it will open it, and you will be able to see the project structure:
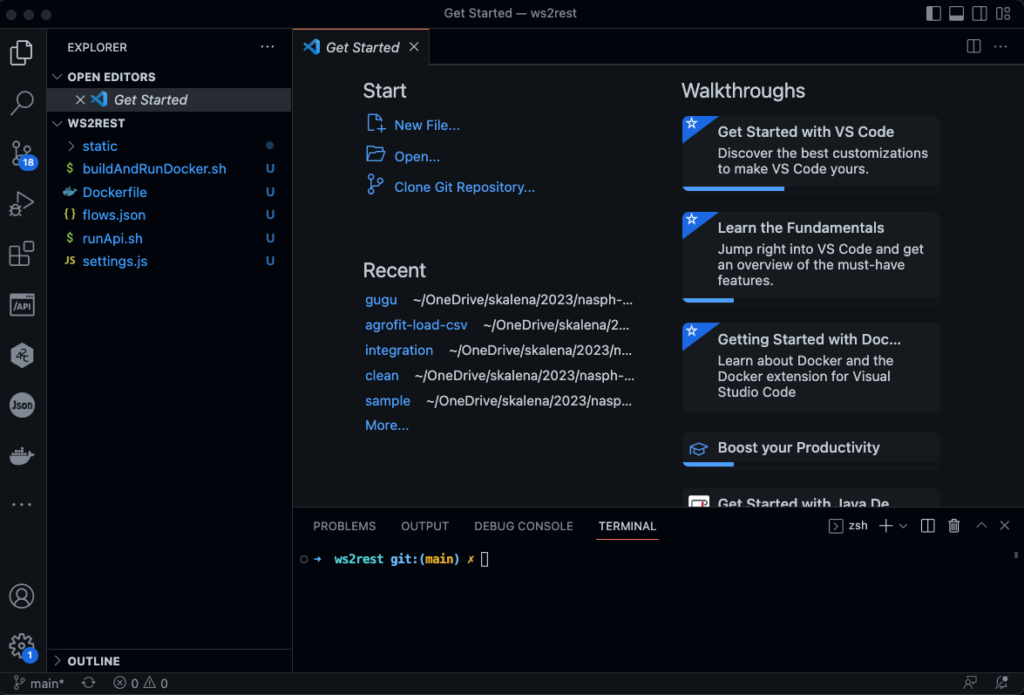
Although this example is using Code, you can use the IDE of you preference.
Installing Dependencies
As mentioned, Flowlet runs on top of Node-Red; for that reason, you must have the Node.js runtime on your machine. We recommend you use Node.js version 18.x. Here is the current version I have installed on my environment:
$ node -v
v18.12.1
Furthermore, you also have to install de Node-red, which is pretty streamlined once you have Node.js installed:
$ npm install -g --unsafe-perm node-redDone; you had installed the requirements to execute Flow appropriately on your machine.
The first exectution
In order to execute Flowlet designer you have to execute the shell script (.sh for X, and .bat for Windows): runAPI.sh , the result will be as the following:
ws2rest git:(main) ✗ ./runApi.sh
14 Jan 17:43:46 - [info]

Welcome to Node-RED
===================

14 Jan 17:43:46 - [info] Node-RED version: v3.0.2
14 Jan 17:43:46 - [info] Node.js  version: v18.12.1
14 Jan 17:43:46 - [info] Darwin 21.6.0 x64 LE
14 Jan 17:43:47 - [info] Loading palette nodes
 ......
14 Jan 17:43:48 - [info] Server now running at http://127.0.0.1:1880/
As you can see in the Log messages, the service has started at the address: http://127.0.0.1:1880/; please, click on this link to open the flow designer, and then you will see the following screen:
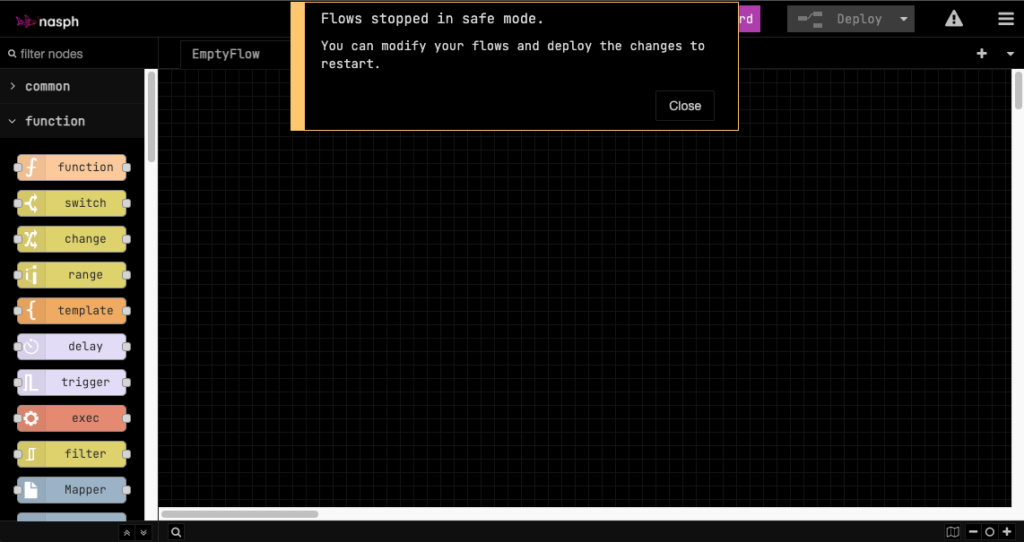
By default, the flows are not started automatically for development mode, so you have to make any slight change to the flow and then deploy it again.
Let’s create a basic flow, just for the sake of the didactics of this post. From the component palette, located on the left, let’s add four nodes:
From the Network Section, let’s add the following components:
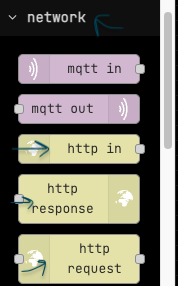
- HTTP In – Responsible for configure out HTTP API Endpoint PATH for our operation
- HTTP Request – Responsible for Invoking the Web Service URL invocation
- HTTP Response – Responsible to send the response back to client that had sent the request.
From the section Function on the palette , please, add the node function :
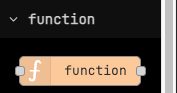
- Function – This is the node we will use when a code is required during the execution flow. It’s a matter of the fact that Node-Red is built on top of Node.js, so guess what: We will use the trendy and lightweight programming language JavaScript when we do need any extra customization.
Configuring the HTTP IN
Please, double click over this node, and configure this node according to the following :
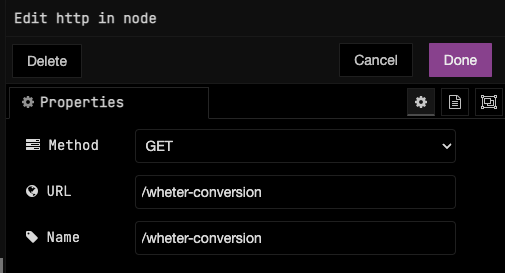
This configuration means:
- A path for our API with the address /whether-conversion will be available and will act as the entry point for this flow.
- The HTTP Method to invoke this path will be HTTP GET.
Configuring the HTTP Request
Please, double click over this node, and configure this node according to the following :
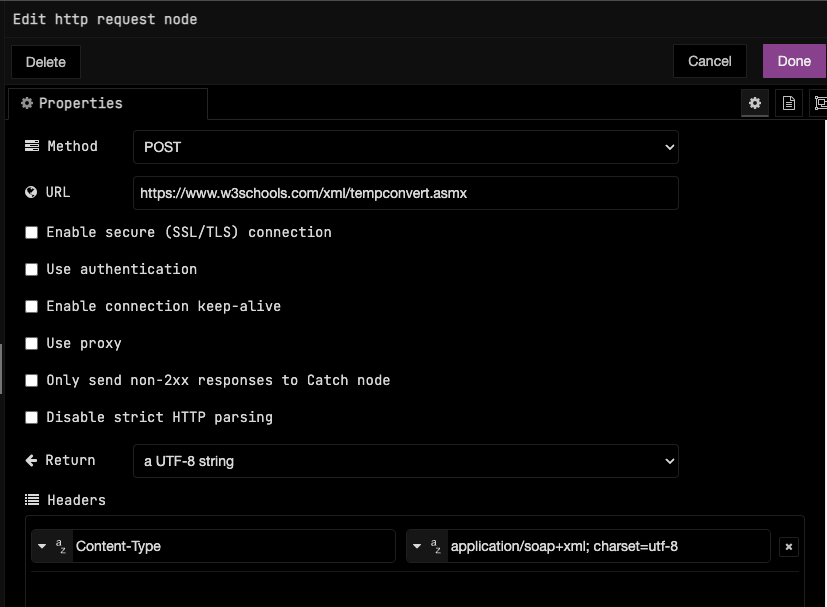
The WebServices execution usually receives XML Data via an HTTP POST; this is the case of this example we are using, and for this reason, we are configuring HTTP POST for Method.
The URL is the URL for this web service: https://www.w3schools.com/xml/tempconvert.asmx
We are also passing the following header:
Content-Type: application/soap+xml; charset=utf-8You must click on the little button “add” right below the headers list to do that.
For the node HTTP Response, we don’t need any special config.
Configuring the Function Node
Please, double click over this node, and configure as the following:
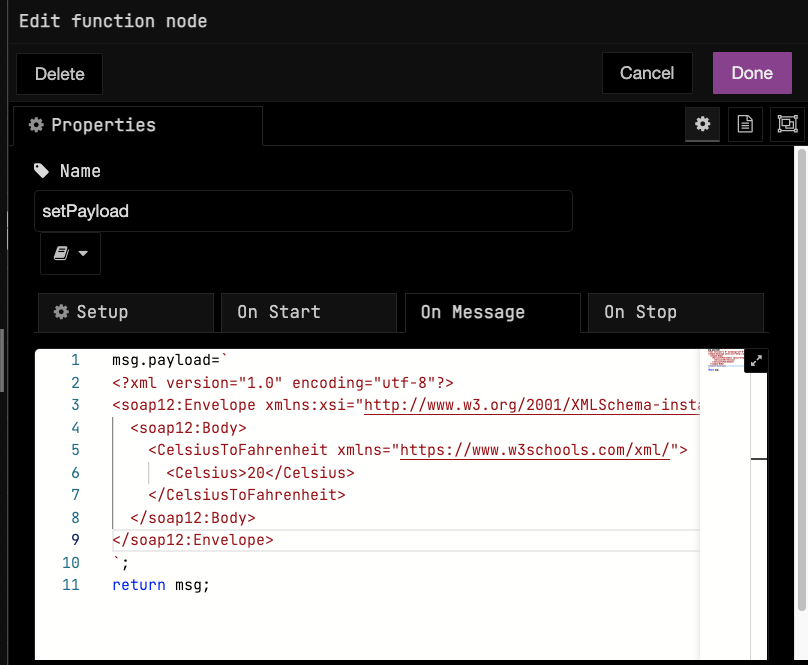
As you can see, we are using the flow’s contextual objects in the flow, in that case, the object called msg. This object contains properties we can inject, transform, and convert data passing over the flow according to our needs. In the above example, we are giving the XML Envelope as the content for the property payload, which contains the current data in this step of the flow of the execution. Here the following source code that you must add to this function node:
msg.payload =`<?xml version="1.0" encoding="utf-8"?>
<soap12:Envelope xmlns:xsi="http://www.w3.org/2001/XMLSchema-instance" xmlns:xsd="http://www.w3.org/2001/XMLSchema" xmlns:soap12="http://www.w3.org/2003/05/soap-envelope">
  <soap12:Body>
    <CelsiusToFahrenheit xmlns="https://www.w3schools.com/xml/">
      <Celsius>20</Celsius>
    </CelsiusToFahrenheit>
  </soap12:Body>
</soap12:Envelope>
`;
return msg;
Connecting the Flow’s Nodes
As the Low-Code approach mandates, we now have to plug one node into another according to the order or step we want to perform along the flow’s execution. In Our case, we will have the following node’s order in our initial flow:

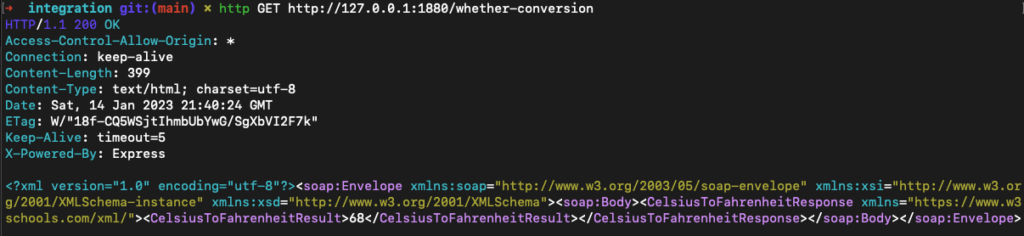
In order to execute our API, please, clink on the Deploy button, and automatically your endpoint will be deployed, the address will the same of the designer UI, adding the HTTP In Path, in that case, /whether-conversion, resulting in: http://127.0.0.1:1880/whether-conversion
When you execute via cURL, HTTPIe, Postman etc, you will just send an HTTP GET method to this url as the following:
$ curl -i http://127.0.0.1:1880/whether-conversion

HTTP/1.1 200 OK
Access-Control-Allow-Origin: *
X-Powered-By: Express
Content-Length: 399
Content-Type: text/html; charset=utf-8
ETag: W/"18f-CQ5WSjtIhmbUbYwG/SgXbVI2F7k"
Date: Sat, 14 Jan 2023 21:36:37 GMT
Connection: keep-alive
Keep-Alive: timeout=5

<?xml version="1.0" encoding="utf-8"?><soap:Envelope xmlns:soap="http://www.w3.org/2003/05/soap-envelope" xmlns:xsi="http://www.w3.org/2001/XMLSchema-instance" xmlns:xsd="http://www.w3.org/2001/XMLSchema"><soap:Body><CelsiusToFahrenheitResponse xmlns="https://www.w3schools.com/xml/"><CelsiusToFahrenheitResult>68</CelsiusToFahrenheitResult></CelsiusToFahrenheitResponse></soap:Body></soap:Envelope>
As you can see, 20 C is equivalent to 68 F !
Adding URI Parameters to this example
You don’t want to create paths/URI for every celsius temperature. For that reason, we will use the URI parameter, so the URI will work pretty much like this: http://127.0.0.1:1880/whether-conversion/20 , where 20 is a URI parameter that we want to pass to the WebService.
We will have to change the HTTP In Node and Function Node. The changes are pretty much the following ones:
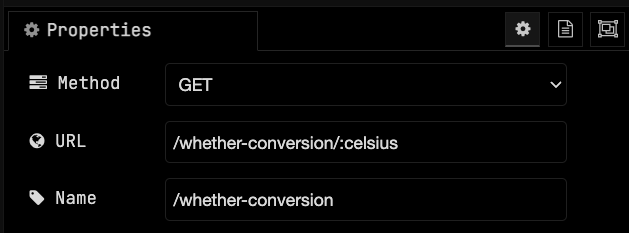
Notice that we added a path variable called celsius after the path definition. It is represented by the :celsius
Now, we will do a change in the function node, according to the following config:
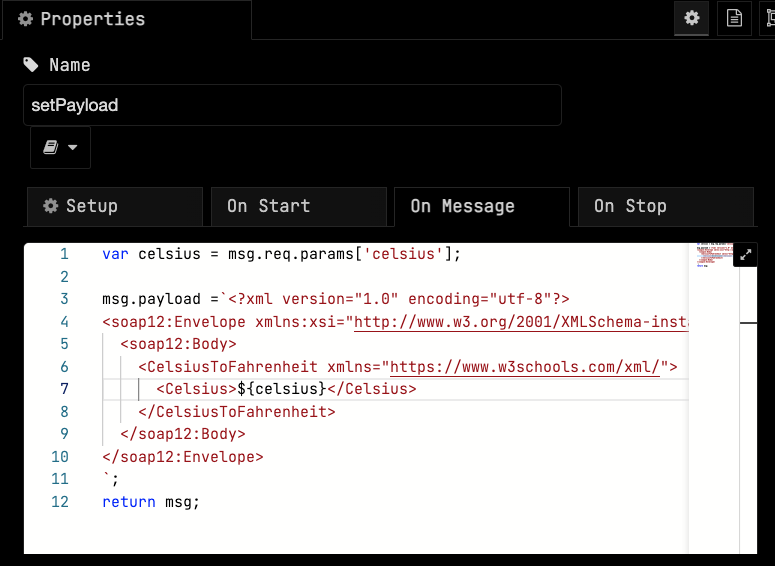
Notice that we did very basic changes:
Line 1: We created a variable called celsius getting the value from the path param called ‘celsius’.
Line 7: We replaced the fixed number (20), by our variable.
Done!
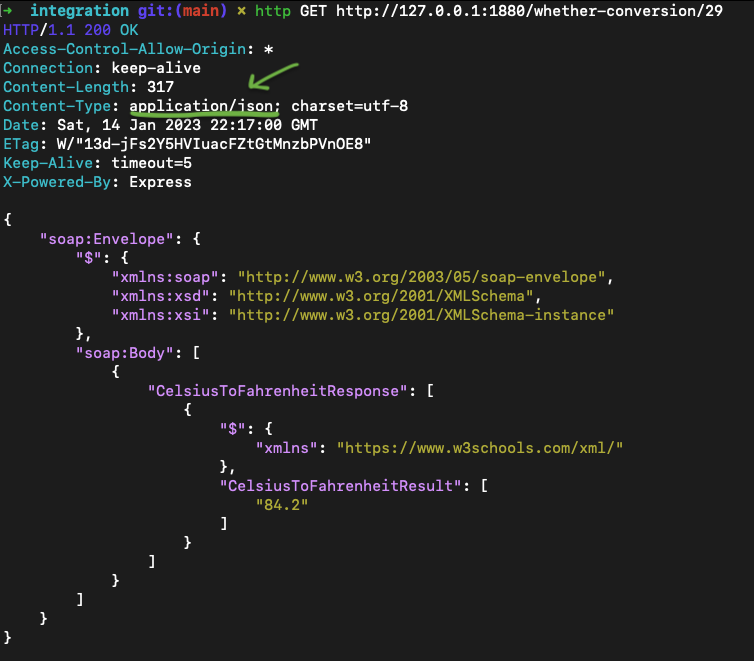
Redeploy it, clicking on the deploy button, and let’s test it again: http://127.0.0.1:1880/whether-conversion/29 (now we want to know the F temperature from 29 C):
$ curl -i http://127.0.0.1:1880/whether-conversion/29

HTTP/1.1 200 OK
Access-Control-Allow-Origin: *
X-Powered-By: Express
Content-Length: 401
Content-Type: text/html; charset=utf-8
ETag: W/"191-/qwUV/UwKqU71kvuaKM3f4XH8Ls"
Date: Sat, 14 Jan 2023 22:02:40 GMT
Connection: keep-alive
Keep-Alive: timeout=5

<?xml version="1.0" encoding="utf-8"?><soap:Envelope xmlns:soap="http://www.w3.org/2003/05/soap-envelope" xmlns:xsi="http://www.w3.org/2001/XMLSchema-instance" xmlns:xsd="http://www.w3.org/2001/XMLSchema"><soap:Body><CelsiusToFahrenheitResponse xmlns="https://www.w3schools.com/xml/"><CelsiusToFahrenheitResult>84.2</CelsiusToFahrenheitResult></CelsiusToFahrenheitResponse></soap:Body></soap:Envelope>%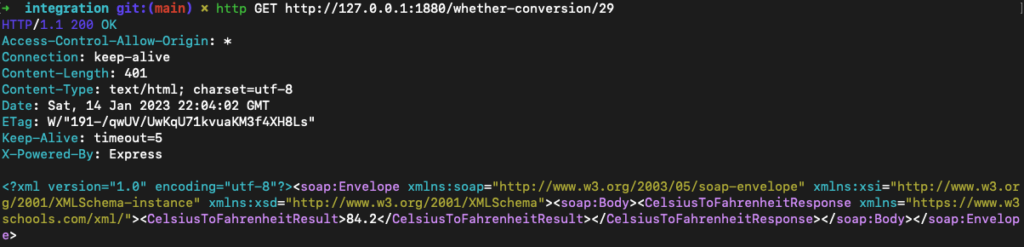
Converting the XML result to JSON Result
To have a REST API, it is recommended that you work with JSON format. For doing that, it’s effortless in Flowlet, you just need a XML Node and JSON node, from the palette “Parser”.
XML Node – Will get the XML String in the flow and will convert to a proper JavaScrip Object
JSON Node -Will get this JavaScript Object into a JSON response.
Those nodes must be after the HTTP Request execution, and before the HTTP Response, like this:

Execute the API again, and you will be able to see the results:
Last, not least
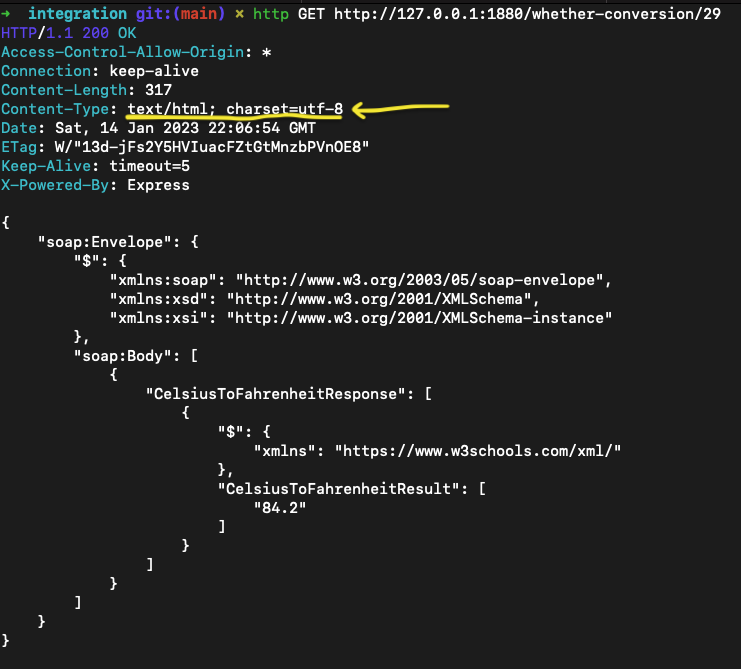
Regardless of the correct execution, as you can see in the previous image, the Content-type has been returned as text/html, which, for some mobile and SPA frameworks such as ReactNative, Vue.js, etc., can be a problem. For that reason, we must add a last header to fix it, which should be added to our HTTP Response node. See the lonely change you have to do into http response node after a double click on it:
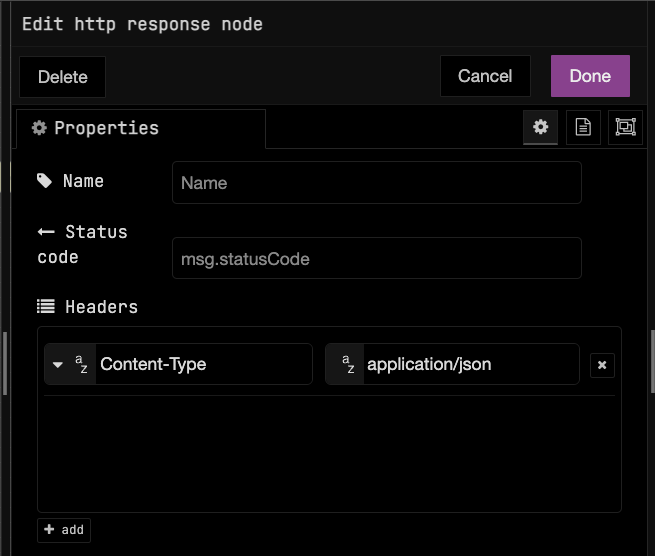
Here you can see the final result:
Conclusion
This is just the result of our initial work on top of Flowlet. We have plenty of items in our backlog, yet, there are many things to do before version 1.0 GA, such as:
- New Nodes for most common integration scenarios: Salesforce, ServiceNow, NoSQL Database, Cloud Connectors, DevOps tools connectors, etc.
- Flowlet is the foundation for other products we are planning. One is a Security Integration Hub, where many cybersecurity scenarios, user information synchronization, batch execution of security policies, and so forth, are expected to get made easy with our extensions.
- Common Integration Use Cases Templates:
- Load CSV and execute a bulk update into a NoSQL Data base such as MongoDB
- Receive a Message from Kafka and execute an Endpoint
- Format SQL results to be presented as expected JSON schema for regulations in place, one of them is Open Insurance in Brazil.
A lot of work yet, but we are pleased to have the chance to share some of this in this article. I hope you like and keep watching our news because we will create Part II of this, improving this service using some transformations and data-cleaning concepts.
Onwards,